<!DOCTYPE html>

<html lang="de">

	<head>

		<meta http-equiv="content-type" content="text/html" charset="UTF-8" />
		<meta name="viewport" content="width=device-width, initial-scale=1.0" >

		<link rel="profile" href="http://gmpg.org/xfn/11">

		<title>Deine Flutter Wetter-App: Schritt für Schritt – Teil 3 &#8211; Allround-Blog</title>
<meta name='robots' content='max-image-preview:large' />
	<style>img:is([sizes="auto" i], [sizes^="auto," i]) { contain-intrinsic-size: 3000px 1500px }</style>
	<link rel='dns-prefetch' href='//stats.wp.com' />
<link rel='dns-prefetch' href='//www.googletagmanager.com' />
<link rel="alternate" type="application/rss+xml" title="Allround-Blog &raquo; Feed" href="https://allround-blog.de/feed/" />
<link rel="alternate" type="application/rss+xml" title="Allround-Blog &raquo; Kommentar-Feed" href="https://allround-blog.de/comments/feed/" />
<link rel="alternate" type="application/rss+xml" title="Allround-Blog &raquo; Deine Flutter Wetter-App: Schritt für Schritt – Teil 3 Kommentar-Feed" href="https://allround-blog.de/software/deine-flutter-wetter-app-schritt-fuer-schritt-teil-3/feed/" />
<script type="text/javascript">
/* <![CDATA[ */
window._wpemojiSettings = {"baseUrl":"https:\/\/s.w.org\/images\/core\/emoji\/15.1.0\/72x72\/","ext":".png","svgUrl":"https:\/\/s.w.org\/images\/core\/emoji\/15.1.0\/svg\/","svgExt":".svg","source":{"concatemoji":"https:\/\/allround-blog.de\/wp-includes\/js\/wp-emoji-release.min.js?ver=6.8"}};
/*! This file is auto-generated */
!function(i,n){var o,s,e;function c(e){try{var t={supportTests:e,timestamp:(new Date).valueOf()};sessionStorage.setItem(o,JSON.stringify(t))}catch(e){}}function p(e,t,n){e.clearRect(0,0,e.canvas.width,e.canvas.height),e.fillText(t,0,0);var t=new Uint32Array(e.getImageData(0,0,e.canvas.width,e.canvas.height).data),r=(e.clearRect(0,0,e.canvas.width,e.canvas.height),e.fillText(n,0,0),new Uint32Array(e.getImageData(0,0,e.canvas.width,e.canvas.height).data));return t.every(function(e,t){return e===r[t]})}function u(e,t,n){switch(t){case"flag":return n(e,"\ud83c\udff3\ufe0f\u200d\u26a7\ufe0f","\ud83c\udff3\ufe0f\u200b\u26a7\ufe0f")?!1:!n(e,"\ud83c\uddfa\ud83c\uddf3","\ud83c\uddfa\u200b\ud83c\uddf3")&&!n(e,"\ud83c\udff4\udb40\udc67\udb40\udc62\udb40\udc65\udb40\udc6e\udb40\udc67\udb40\udc7f","\ud83c\udff4\u200b\udb40\udc67\u200b\udb40\udc62\u200b\udb40\udc65\u200b\udb40\udc6e\u200b\udb40\udc67\u200b\udb40\udc7f");case"emoji":return!n(e,"\ud83d\udc26\u200d\ud83d\udd25","\ud83d\udc26\u200b\ud83d\udd25")}return!1}function f(e,t,n){var r="undefined"!=typeof WorkerGlobalScope&&self instanceof WorkerGlobalScope?new OffscreenCanvas(300,150):i.createElement("canvas"),a=r.getContext("2d",{willReadFrequently:!0}),o=(a.textBaseline="top",a.font="600 32px Arial",{});return e.forEach(function(e){o[e]=t(a,e,n)}),o}function t(e){var t=i.createElement("script");t.src=e,t.defer=!0,i.head.appendChild(t)}"undefined"!=typeof Promise&&(o="wpEmojiSettingsSupports",s=["flag","emoji"],n.supports={everything:!0,everythingExceptFlag:!0},e=new Promise(function(e){i.addEventListener("DOMContentLoaded",e,{once:!0})}),new Promise(function(t){var n=function(){try{var e=JSON.parse(sessionStorage.getItem(o));if("object"==typeof e&&"number"==typeof e.timestamp&&(new Date).valueOf()<e.timestamp+604800&&"object"==typeof e.supportTests)return e.supportTests}catch(e){}return null}();if(!n){if("undefined"!=typeof Worker&&"undefined"!=typeof OffscreenCanvas&&"undefined"!=typeof URL&&URL.createObjectURL&&"undefined"!=typeof Blob)try{var e="postMessage("+f.toString()+"("+[JSON.stringify(s),u.toString(),p.toString()].join(",")+"));",r=new Blob([e],{type:"text/javascript"}),a=new Worker(URL.createObjectURL(r),{name:"wpTestEmojiSupports"});return void(a.onmessage=function(e){c(n=e.data),a.terminate(),t(n)})}catch(e){}c(n=f(s,u,p))}t(n)}).then(function(e){for(var t in e)n.supports[t]=e[t],n.supports.everything=n.supports.everything&&n.supports[t],"flag"!==t&&(n.supports.everythingExceptFlag=n.supports.everythingExceptFlag&&n.supports[t]);n.supports.everythingExceptFlag=n.supports.everythingExceptFlag&&!n.supports.flag,n.DOMReady=!1,n.readyCallback=function(){n.DOMReady=!0}}).then(function(){return e}).then(function(){var e;n.supports.everything||(n.readyCallback(),(e=n.source||{}).concatemoji?t(e.concatemoji):e.wpemoji&&e.twemoji&&(t(e.twemoji),t(e.wpemoji)))}))}((window,document),window._wpemojiSettings);
/* ]]> */
</script>
<style id='wp-emoji-styles-inline-css' type='text/css'>

	img.wp-smiley, img.emoji {
		display: inline !important;
		border: none !important;
		box-shadow: none !important;
		height: 1em !important;
		width: 1em !important;
		margin: 0 0.07em !important;
		vertical-align: -0.1em !important;
		background: none !important;
		padding: 0 !important;
	}
</style>
<link rel='stylesheet' id='wp-block-library-css' href='https://allround-blog.de/wp-content/plugins/gutenberg/build/styles/block-library/style.min.css?ver=23.1.1' type='text/css' media='all' />
<style id='classic-theme-styles-inline-css' type='text/css'>
.wp-block-button__link{background-color:#32373c;border-radius:9999px;box-shadow:none;color:#fff;font-size:1.125em;padding:calc(.667em + 2px) calc(1.333em + 2px);text-decoration:none}.wp-block-file__button{background:#32373c;color:#fff}.wp-block-accordion-heading{margin:0}.wp-block-accordion-heading__toggle{background-color:inherit!important;color:inherit!important}.wp-block-accordion-heading__toggle:not(:focus-visible){outline:none}.wp-block-accordion-heading__toggle:focus,.wp-block-accordion-heading__toggle:hover{background-color:inherit!important;border:none;box-shadow:none;color:inherit;padding:var(--wp--preset--spacing--20,1em) 0;text-decoration:none}.wp-block-accordion-heading__toggle:focus-visible{outline:auto;outline-offset:0}.wp-block-tab:not(.has-text-color){color:inherit!important}.wp-block-tab:not(.has-background){background-color:inherit!important}.wp-block-tab:focus,.wp-block-tab:hover{text-decoration:none}.wp-block-tab:focus-visible{outline:auto;outline-offset:0}
</style>
<link rel='stylesheet' id='jetpack-forms-layout-css' href='https://allround-blog.de/wp-content/plugins/jetpack/jetpack_vendor/automattic/jetpack-forms/src/../dist/contact-form/css/jetpack-forms-layout.css?ver=15.8' type='text/css' media='all' />
<link rel='stylesheet' id='mediaelement-css' href='https://allround-blog.de/wp-includes/js/mediaelement/mediaelementplayer-legacy.min.css?ver=4.2.17' type='text/css' media='all' />
<link rel='stylesheet' id='wp-mediaelement-css' href='https://allround-blog.de/wp-includes/js/mediaelement/wp-mediaelement.min.css?ver=6.8' type='text/css' media='all' />
<style id='jetpack-sharing-buttons-style-inline-css' type='text/css'>
.jetpack-sharing-buttons__services-list{display:flex;flex-direction:row;flex-wrap:wrap;gap:0;list-style-type:none;margin:5px;padding:0}.jetpack-sharing-buttons__services-list.has-small-icon-size{font-size:12px}.jetpack-sharing-buttons__services-list.has-normal-icon-size{font-size:16px}.jetpack-sharing-buttons__services-list.has-large-icon-size{font-size:24px}.jetpack-sharing-buttons__services-list.has-huge-icon-size{font-size:36px}@media print{.jetpack-sharing-buttons__services-list{display:none!important}}.editor-styles-wrapper .wp-block-jetpack-sharing-buttons{gap:0;padding-inline-start:0}ul.jetpack-sharing-buttons__services-list.has-background{padding:1.25em 2.375em}
</style>
<style id='global-styles-inline-css' type='text/css'>
:root{--wp--preset--aspect-ratio--square: 1;--wp--preset--aspect-ratio--4-3: 4/3;--wp--preset--aspect-ratio--3-4: 3/4;--wp--preset--aspect-ratio--3-2: 3/2;--wp--preset--aspect-ratio--2-3: 2/3;--wp--preset--aspect-ratio--16-9: 16/9;--wp--preset--aspect-ratio--9-16: 9/16;--wp--preset--color--black: #000000;--wp--preset--color--cyan-bluish-gray: #abb8c3;--wp--preset--color--white: #fff;--wp--preset--color--pale-pink: #f78da7;--wp--preset--color--vivid-red: #cf2e2e;--wp--preset--color--luminous-vivid-orange: #ff6900;--wp--preset--color--luminous-vivid-amber: #fcb900;--wp--preset--color--light-green-cyan: #7bdcb5;--wp--preset--color--vivid-green-cyan: #00d084;--wp--preset--color--pale-cyan-blue: #8ed1fc;--wp--preset--color--vivid-cyan-blue: #0693e3;--wp--preset--color--vivid-purple: #9b51e0;--wp--preset--color--accent: #1abc9c;--wp--preset--color--dark-gray: #444;--wp--preset--color--medium-gray: #666;--wp--preset--color--light-gray: #888;--wp--preset--gradient--vivid-cyan-blue-to-vivid-purple: linear-gradient(135deg,rgb(6,147,227) 0%,rgb(155,81,224) 100%);--wp--preset--gradient--light-green-cyan-to-vivid-green-cyan: linear-gradient(135deg,rgb(122,220,180) 0%,rgb(0,208,130) 100%);--wp--preset--gradient--luminous-vivid-amber-to-luminous-vivid-orange: linear-gradient(135deg,rgb(252,185,0) 0%,rgb(255,105,0) 100%);--wp--preset--gradient--luminous-vivid-orange-to-vivid-red: linear-gradient(135deg,rgb(255,105,0) 0%,rgb(207,46,46) 100%);--wp--preset--gradient--very-light-gray-to-cyan-bluish-gray: linear-gradient(135deg,rgb(238,238,238) 0%,rgb(169,184,195) 100%);--wp--preset--gradient--cool-to-warm-spectrum: linear-gradient(135deg,rgb(74,234,220) 0%,rgb(151,120,209) 20%,rgb(207,42,186) 40%,rgb(238,44,130) 60%,rgb(251,105,98) 80%,rgb(254,248,76) 100%);--wp--preset--gradient--blush-light-purple: linear-gradient(135deg,rgb(255,206,236) 0%,rgb(152,150,240) 100%);--wp--preset--gradient--blush-bordeaux: linear-gradient(135deg,rgb(254,205,165) 0%,rgb(254,45,45) 50%,rgb(107,0,62) 100%);--wp--preset--gradient--luminous-dusk: linear-gradient(135deg,rgb(255,203,112) 0%,rgb(199,81,192) 50%,rgb(65,88,208) 100%);--wp--preset--gradient--pale-ocean: linear-gradient(135deg,rgb(255,245,203) 0%,rgb(182,227,212) 50%,rgb(51,167,181) 100%);--wp--preset--gradient--electric-grass: linear-gradient(135deg,rgb(202,248,128) 0%,rgb(113,206,126) 100%);--wp--preset--gradient--midnight: linear-gradient(135deg,rgb(2,3,129) 0%,rgb(40,116,252) 100%);--wp--preset--font-size--small: 16px;--wp--preset--font-size--medium: 20px;--wp--preset--font-size--large: 24px;--wp--preset--font-size--x-large: 42px;--wp--preset--font-size--regular: 19px;--wp--preset--font-size--larger: 32px;--wp--preset--spacing--20: 0.44rem;--wp--preset--spacing--30: 0.67rem;--wp--preset--spacing--40: 1rem;--wp--preset--spacing--50: 1.5rem;--wp--preset--spacing--60: 2.25rem;--wp--preset--spacing--70: 3.38rem;--wp--preset--spacing--80: 5.06rem;--wp--preset--shadow--natural: 6px 6px 9px rgba(0, 0, 0, 0.2);--wp--preset--shadow--deep: 12px 12px 50px rgba(0, 0, 0, 0.4);--wp--preset--shadow--sharp: 6px 6px 0px rgba(0, 0, 0, 0.2);--wp--preset--shadow--outlined: 6px 6px 0px -3px rgb(255, 255, 255), 6px 6px rgb(0, 0, 0);--wp--preset--shadow--crisp: 6px 6px 0px rgb(0, 0, 0);}.wp-block-button{--wp--preset--dimension--25: 25%;--wp--preset--dimension--50: 50%;--wp--preset--dimension--75: 75%;--wp--preset--dimension--100: 100%;}:where(body) { margin: 0; }:where(.is-layout-flex){gap: 0.5em;}:where(.is-layout-grid){gap: 0.5em;}body .is-layout-flex{display: flex;}.is-layout-flex{flex-wrap: wrap;align-items: center;}.is-layout-flex > :is(*, div){margin: 0;}body .is-layout-grid{display: grid;}.is-layout-grid > :is(*, div){margin: 0;}body{padding-top: 0px;padding-right: 0px;padding-bottom: 0px;padding-left: 0px;}:root :where(.wp-element-button, .wp-block-button__link){background-color: #32373c;border-width: 0;color: #fff;font-family: inherit;font-size: inherit;font-style: inherit;font-weight: inherit;letter-spacing: inherit;line-height: inherit;padding-top: calc(0.667em + 2px);padding-right: calc(1.333em + 2px);padding-bottom: calc(0.667em + 2px);padding-left: calc(1.333em + 2px);text-decoration: none;text-transform: inherit;}.has-black-color{color: var(--wp--preset--color--black) !important;}.has-cyan-bluish-gray-color{color: var(--wp--preset--color--cyan-bluish-gray) !important;}.has-white-color{color: var(--wp--preset--color--white) !important;}.has-pale-pink-color{color: var(--wp--preset--color--pale-pink) !important;}.has-vivid-red-color{color: var(--wp--preset--color--vivid-red) !important;}.has-luminous-vivid-orange-color{color: var(--wp--preset--color--luminous-vivid-orange) !important;}.has-luminous-vivid-amber-color{color: var(--wp--preset--color--luminous-vivid-amber) !important;}.has-light-green-cyan-color{color: var(--wp--preset--color--light-green-cyan) !important;}.has-vivid-green-cyan-color{color: var(--wp--preset--color--vivid-green-cyan) !important;}.has-pale-cyan-blue-color{color: var(--wp--preset--color--pale-cyan-blue) !important;}.has-vivid-cyan-blue-color{color: var(--wp--preset--color--vivid-cyan-blue) !important;}.has-vivid-purple-color{color: var(--wp--preset--color--vivid-purple) !important;}.has-accent-color{color: var(--wp--preset--color--accent) !important;}.has-dark-gray-color{color: var(--wp--preset--color--dark-gray) !important;}.has-medium-gray-color{color: var(--wp--preset--color--medium-gray) !important;}.has-light-gray-color{color: var(--wp--preset--color--light-gray) !important;}.has-black-background-color{background-color: var(--wp--preset--color--black) !important;}.has-cyan-bluish-gray-background-color{background-color: var(--wp--preset--color--cyan-bluish-gray) !important;}.has-white-background-color{background-color: var(--wp--preset--color--white) !important;}.has-pale-pink-background-color{background-color: var(--wp--preset--color--pale-pink) !important;}.has-vivid-red-background-color{background-color: var(--wp--preset--color--vivid-red) !important;}.has-luminous-vivid-orange-background-color{background-color: var(--wp--preset--color--luminous-vivid-orange) !important;}.has-luminous-vivid-amber-background-color{background-color: var(--wp--preset--color--luminous-vivid-amber) !important;}.has-light-green-cyan-background-color{background-color: var(--wp--preset--color--light-green-cyan) !important;}.has-vivid-green-cyan-background-color{background-color: var(--wp--preset--color--vivid-green-cyan) !important;}.has-pale-cyan-blue-background-color{background-color: var(--wp--preset--color--pale-cyan-blue) !important;}.has-vivid-cyan-blue-background-color{background-color: var(--wp--preset--color--vivid-cyan-blue) !important;}.has-vivid-purple-background-color{background-color: var(--wp--preset--color--vivid-purple) !important;}.has-accent-background-color{background-color: var(--wp--preset--color--accent) !important;}.has-dark-gray-background-color{background-color: var(--wp--preset--color--dark-gray) !important;}.has-medium-gray-background-color{background-color: var(--wp--preset--color--medium-gray) !important;}.has-light-gray-background-color{background-color: var(--wp--preset--color--light-gray) !important;}.has-black-border-color{border-color: var(--wp--preset--color--black) !important;}.has-cyan-bluish-gray-border-color{border-color: var(--wp--preset--color--cyan-bluish-gray) !important;}.has-white-border-color{border-color: var(--wp--preset--color--white) !important;}.has-pale-pink-border-color{border-color: var(--wp--preset--color--pale-pink) !important;}.has-vivid-red-border-color{border-color: var(--wp--preset--color--vivid-red) !important;}.has-luminous-vivid-orange-border-color{border-color: var(--wp--preset--color--luminous-vivid-orange) !important;}.has-luminous-vivid-amber-border-color{border-color: var(--wp--preset--color--luminous-vivid-amber) !important;}.has-light-green-cyan-border-color{border-color: var(--wp--preset--color--light-green-cyan) !important;}.has-vivid-green-cyan-border-color{border-color: var(--wp--preset--color--vivid-green-cyan) !important;}.has-pale-cyan-blue-border-color{border-color: var(--wp--preset--color--pale-cyan-blue) !important;}.has-vivid-cyan-blue-border-color{border-color: var(--wp--preset--color--vivid-cyan-blue) !important;}.has-vivid-purple-border-color{border-color: var(--wp--preset--color--vivid-purple) !important;}.has-accent-border-color{border-color: var(--wp--preset--color--accent) !important;}.has-dark-gray-border-color{border-color: var(--wp--preset--color--dark-gray) !important;}.has-medium-gray-border-color{border-color: var(--wp--preset--color--medium-gray) !important;}.has-light-gray-border-color{border-color: var(--wp--preset--color--light-gray) !important;}.has-vivid-cyan-blue-to-vivid-purple-gradient-background{background: var(--wp--preset--gradient--vivid-cyan-blue-to-vivid-purple) !important;}.has-light-green-cyan-to-vivid-green-cyan-gradient-background{background: var(--wp--preset--gradient--light-green-cyan-to-vivid-green-cyan) !important;}.has-luminous-vivid-amber-to-luminous-vivid-orange-gradient-background{background: var(--wp--preset--gradient--luminous-vivid-amber-to-luminous-vivid-orange) !important;}.has-luminous-vivid-orange-to-vivid-red-gradient-background{background: var(--wp--preset--gradient--luminous-vivid-orange-to-vivid-red) !important;}.has-very-light-gray-to-cyan-bluish-gray-gradient-background{background: var(--wp--preset--gradient--very-light-gray-to-cyan-bluish-gray) !important;}.has-cool-to-warm-spectrum-gradient-background{background: var(--wp--preset--gradient--cool-to-warm-spectrum) !important;}.has-blush-light-purple-gradient-background{background: var(--wp--preset--gradient--blush-light-purple) !important;}.has-blush-bordeaux-gradient-background{background: var(--wp--preset--gradient--blush-bordeaux) !important;}.has-luminous-dusk-gradient-background{background: var(--wp--preset--gradient--luminous-dusk) !important;}.has-pale-ocean-gradient-background{background: var(--wp--preset--gradient--pale-ocean) !important;}.has-electric-grass-gradient-background{background: var(--wp--preset--gradient--electric-grass) !important;}.has-midnight-gradient-background{background: var(--wp--preset--gradient--midnight) !important;}.has-small-font-size{font-size: var(--wp--preset--font-size--small) !important;}.has-medium-font-size{font-size: var(--wp--preset--font-size--medium) !important;}.has-large-font-size{font-size: var(--wp--preset--font-size--large) !important;}.has-x-large-font-size{font-size: var(--wp--preset--font-size--x-large) !important;}.has-regular-font-size{font-size: var(--wp--preset--font-size--regular) !important;}.has-larger-font-size{font-size: var(--wp--preset--font-size--larger) !important;}
:root :where(.wp-block-icon svg){width: 24px;}
:where(.wp-block-columns.is-layout-flex){gap: 2em;}:where(.wp-block-columns.is-layout-grid){gap: 2em;}
:root :where(.wp-block-pullquote){font-size: 1.5em;line-height: 1.6;}
:where(.wp-block-post-template.is-layout-flex){gap: 1.25em;}:where(.wp-block-post-template.is-layout-grid){gap: 1.25em;}
:where(.wp-block-term-template.is-layout-flex){gap: 1.25em;}:where(.wp-block-term-template.is-layout-grid){gap: 1.25em;}
</style>
<link rel='stylesheet' id='enlighterjs-css' href='https://allround-blog.de/wp-content/plugins/enlighter/cache/enlighterjs.min.css?ver=fn+b0MXDe0j/NUW' type='text/css' media='all' />
<link rel='stylesheet' id='hemingway_googleFonts-css' href='https://allround-blog.de/wp-content/themes/hemingway/assets/css/fonts.css' type='text/css' media='all' />
<link rel='stylesheet' id='hemingway_style-css' href='https://allround-blog.de/wp-content/themes/hemingway/style.css?ver=2.3.2' type='text/css' media='all' />
<script type="text/javascript" src="https://allround-blog.de/wp-content/plugins/strato-assistant/js/cookies.js?ver=1728459796" id="strato-assistant-wp-cookies-js"></script>
<script type="text/javascript" src="https://allround-blog.de/wp-includes/js/jquery/jquery.min.js?ver=3.7.1" id="jquery-core-js"></script>
<script type="text/javascript" src="https://allround-blog.de/wp-includes/js/jquery/jquery-migrate.min.js?ver=3.4.1" id="jquery-migrate-js"></script>
<link rel="https://api.w.org/" href="https://allround-blog.de/wp-json/" /><link rel="alternate" title="JSON" type="application/json" href="https://allround-blog.de/wp-json/wp/v2/posts/228" /><link rel="EditURI" type="application/rsd+xml" title="RSD" href="https://allround-blog.de/xmlrpc.php?rsd" />
<meta name="generator" content="WordPress 6.8" />
<link rel="canonical" href="https://allround-blog.de/software/deine-flutter-wetter-app-schritt-fuer-schritt-teil-3/" />
<link rel='shortlink' href='https://allround-blog.de/?p=228' />
<link rel="alternate" title="oEmbed (JSON)" type="application/json+oembed" href="https://allround-blog.de/wp-json/oembed/1.0/embed?url=https%3A%2F%2Fallround-blog.de%2Fsoftware%2Fdeine-flutter-wetter-app-schritt-fuer-schritt-teil-3%2F" />
<link rel="alternate" title="oEmbed (XML)" type="text/xml+oembed" href="https://allround-blog.de/wp-json/oembed/1.0/embed?url=https%3A%2F%2Fallround-blog.de%2Fsoftware%2Fdeine-flutter-wetter-app-schritt-fuer-schritt-teil-3%2F&#038;format=xml" />
<meta name="generator" content="Site Kit by Google 1.179.0" />	<style>img#wpstats{display:none}</style>
		<style type="text/css" id="custom-background-css">
body.custom-background { background-image: url("https://allround-blog.de/wp-content/uploads/2024/10/background1.png"); background-position: center top; background-size: auto; background-repeat: no-repeat; background-attachment: fixed; }
</style>
	<link rel="icon" href="https://allround-blog.de/wp-content/uploads/2024/10/cropped-sprechblasen-favicon-32x32.webp" sizes="32x32" />
<link rel="icon" href="https://allround-blog.de/wp-content/uploads/2024/10/cropped-sprechblasen-favicon-192x192.webp" sizes="192x192" />
<link rel="apple-touch-icon" href="https://allround-blog.de/wp-content/uploads/2024/10/cropped-sprechblasen-favicon-180x180.webp" />
<meta name="msapplication-TileImage" content="https://allround-blog.de/wp-content/uploads/2024/10/cropped-sprechblasen-favicon-270x270.webp" />

	</head>
	
	<body class="wp-singular post-template-default single single-post postid-228 single-format-standard custom-background wp-theme-hemingway show-sidebar-on-mobile">

		
		<a class="skip-link button" href="#site-content">Zum Inhalt springen</a>
	
		<div class="big-wrapper">
	
			<div class="header-cover section bg-dark-light no-padding">

						
				<div class="header section" style="background-image: url( https://allround-blog.de/wp-content/uploads/2024/10/cropped-20230701_052808-scaled-1.jpg );">
							
					<div class="header-inner section-inner">
					
											
							<div class="blog-info">
							
																	<div class="blog-title">
										<a href="https://allround-blog.de" rel="home">Allround-Blog</a>
									</div>
																
																	<p class="blog-description">ein buntes Themenspektrum</p>
															
							</div><!-- .blog-info -->
							
															
					</div><!-- .header-inner -->
								
				</div><!-- .header -->
			
			</div><!-- .bg-dark -->
			
			<div class="navigation section no-padding bg-dark">
			
				<div class="navigation-inner section-inner group">
				
					<div class="toggle-container section-inner hidden">
			
						<button type="button" class="nav-toggle toggle">
							<div class="bar"></div>
							<div class="bar"></div>
							<div class="bar"></div>
							<span class="screen-reader-text">Mobile-Menü ein-/ausblenden</span>
						</button>
						
						<button type="button" class="search-toggle toggle">
							<div class="metal"></div>
							<div class="glass"></div>
							<div class="handle"></div>
							<span class="screen-reader-text">Suchfeld ein-/ausblenden</span>
						</button>
											
					</div><!-- .toggle-container -->
					
					<div class="blog-search hidden">
						<form role="search" method="get" class="search-form" action="https://allround-blog.de/">
				<label>
					<span class="screen-reader-text">Suche nach:</span>
					<input type="search" class="search-field" placeholder="Suchen …" value="" name="s" />
				</label>
				<input type="submit" class="search-submit" value="Suchen" />
			</form>					</div><!-- .blog-search -->
				
					<ul class="blog-menu">
						<li class="page_item page-item-3"><a href="https://allround-blog.de/privacy-policy/">Impressum</a></li>
					 </ul><!-- .blog-menu -->
					 
					 <ul class="mobile-menu">
					
						<li class="page_item page-item-3"><a href="https://allround-blog.de/privacy-policy/">Impressum</a></li>
						
					 </ul><!-- .mobile-menu -->
				 
				</div><!-- .navigation-inner -->
				
			</div><!-- .navigation -->
<main class="wrapper section-inner group" id="site-content">

	<div class="content left">

		<div class="posts">
												        
			<article id="post-228" class="post-228 post type-post status-publish format-standard has-post-thumbnail hentry category-software category-wetter category-wetter-app-entwicklung tag-android tag-dart tag-flutter">

	<div class="post-header">


			<figure class="featured-media">

							
					<a href="https://allround-blog.de/software/deine-flutter-wetter-app-schritt-fuer-schritt-teil-3/" rel="bookmark">
						<img width="676" height="463" src="https://allround-blog.de/wp-content/uploads/2025/04/v2-sxju9-wl514-676x463.jpg" class="attachment-post-image size-post-image wp-post-image" alt="" decoding="async" fetchpriority="high" srcset="https://allround-blog.de/wp-content/uploads/2025/04/v2-sxju9-wl514-676x463.jpg 676w, https://allround-blog.de/wp-content/uploads/2025/04/v2-sxju9-wl514-300x205.jpg 300w, https://allround-blog.de/wp-content/uploads/2025/04/v2-sxju9-wl514-1024x701.jpg 1024w, https://allround-blog.de/wp-content/uploads/2025/04/v2-sxju9-wl514-768x525.jpg 768w, https://allround-blog.de/wp-content/uploads/2025/04/v2-sxju9-wl514.jpg 1216w" sizes="(max-width: 676px) 100vw, 676px" data-attachment-id="235" data-permalink="https://allround-blog.de/software/deine-flutter-wetter-app-schritt-fuer-schritt-teil-3/attachment/v2-sxju9-wl514/" data-orig-file="https://allround-blog.de/wp-content/uploads/2025/04/v2-sxju9-wl514.jpg" data-orig-size="1216,832" data-comments-opened="1" data-image-meta="{&quot;aperture&quot;:&quot;0&quot;,&quot;credit&quot;:&quot;&quot;,&quot;camera&quot;:&quot;&quot;,&quot;caption&quot;:&quot;&quot;,&quot;created_timestamp&quot;:&quot;0&quot;,&quot;copyright&quot;:&quot;&quot;,&quot;focal_length&quot;:&quot;0&quot;,&quot;iso&quot;:&quot;0&quot;,&quot;shutter_speed&quot;:&quot;0&quot;,&quot;title&quot;:&quot;&quot;,&quot;orientation&quot;:&quot;0&quot;}" data-image-title="Wetterkarte" data-image-description="" data-image-caption="" data-large-file="https://allround-blog.de/wp-content/uploads/2025/04/v2-sxju9-wl514-1024x701.jpg" />					</a>


			</figure><!-- .featured-media -->
				
						
				<h1 class="post-title entry-title">
											Deine Flutter Wetter-App: Schritt für Schritt – Teil 3									</h1>

							
			<div class="post-meta">
			
				<span class="post-date"><a href="https://allround-blog.de/software/deine-flutter-wetter-app-schritt-fuer-schritt-teil-3/">21.04.2025</a></span>
				
				<span class="date-sep"> / </span>
					
				<span class="post-author"><a href="https://allround-blog.de/author/hschewe/" title="Beiträge von Heinrich Schewe" rel="author">Heinrich Schewe</a></span>

				
					<span class="date-sep"> / </span>
				
					<a href="https://allround-blog.de/software/deine-flutter-wetter-app-schritt-fuer-schritt-teil-3/#comments">1 Kommentar</a>
								
														
			</div><!-- .post-meta -->

					
	</div><!-- .post-header -->
																					
	<div class="post-content entry-content">
	
		
<p class="wp-block-paragraph"><strong>Teil 3: Der erste Meilenstein: Aktuelle Temperatur am aktuellen Ort – Den Code verstehen</strong></p>


<p class="wp-block-paragraph">Hallo und willkommen zurück zur Serie!</p>


<p class="wp-block-paragraph">In <a href="link-zu-teil-2.html">Teil 2</a> haben wir unsere Werkzeuge geschärft und die Flutter-Entwicklungsumgebung auf deinem Windows-PC eingerichtet. Wir haben sogar die Standard-Flutter-App zum Laufen gebracht. Super!</p>


<p class="wp-block-paragraph">Heute tauchen wir endlich in den <em>eigentlichen</em> Code unserer Wetter-App ein. Wir überspringen das manuelle Tippen jedes Zeichens und konzentrieren uns stattdessen darauf, den Code für unseren <strong>ersten Meilenstein</strong> zu verstehen: <strong>Die App soll die aktuelle Temperatur für deinen aktuellen GPS-Standort anzeigen.</strong></p>


<p class="wp-block-paragraph"><strong>Das Ziel für heute:</strong></p>


<ul class="wp-block-list">
<li>Wir schauen uns den vorbereiteten Code für Teil 3 an (den du aus einem Repository herunterladen kannst).</li>


<li>Wir zerlegen die <strong>Projektstruktur</strong> und verstehen, welche Datei wo hingehört und warum.</li>


<li>Wir verfolgen den <strong>Datenfluss</strong>: Wie kommt die Temperatur vom Internet auf deinen Bildschirm?</li>


<li>Wir beleuchten die <strong>wichtigsten Konzepte</strong>: Architektur, State Management mit Riverpod, Fehlerbehandlung und mehr.</li>
</ul>


<p class="wp-block-paragraph"><strong>Warum dieser Ansatz?</strong></p>


<p class="wp-block-paragraph">Eine App zu bauen ist wie ein Haus zu bauen. Man könnte einfach loslegen, aber ein guter Architekt plant zuerst. Wir haben den Code für diesen ersten Schritt bereits nach einem bewährten Plan (einer &#8222;sauberen Architektur&#8220;) strukturiert. Indem wir diesen fertigen, aber einfachen Code untersuchen, lernst du nicht nur, <em>wie</em> man eine Funktion implementiert, sondern auch, <em>wie man Code organisiert</em>, damit er später leicht erweitert, getestet und gewartet werden kann. Das ist entscheidend, um selbst gute Apps zu schreiben!</p>


<p class="wp-block-paragraph"><strong>Schritt 1: Den Code holen</strong></p>


<p class="wp-block-paragraph">Der gesamte Code für diesen Teil der Serie ist in einem Git-Repository vorbereitet.</p>


<ol class="wp-block-list">
<li><strong>Repository klonen (falls noch nicht geschehen):</strong><br>Öffne eine Eingabeaufforderung oder ein Terminal und navigiere zu dem Ordner, in dem du deine Projekte speichern möchtest (z.B. <code>C:\dev\flutter_projekte\</code>). Führe dann folgenden Befehl aus:<br><code>git clone https://github.com/hschewe/flutter_weather_app_blog.git</code><br>Wechsle in das neu erstellte Verzeichnis:<br><code>bash cd flutter_weather_app_blog</code></li>


<li><strong>Den richtigen Stand auschecken:</strong> Für jeden Teil der Serie gibt es einen Git-Tag. Um den Code-Stand für Teil 3 zu bekommen, führe aus:<br><code>git checkout part3-current-temp-gps</code>.<br>(Git meldet möglicherweise, dass du dich in einem &#8218;detached HEAD&#8216;-Zustand befindest. Das ist normal und bedeutet, du schaust dir einen spezifischen Punkt in der Vergangenheit an. Du kannst den den Code untersuchen, ausführen und sogar temporäre Änderungen vornehmen. Wenn du zur normalen Entwicklung zurückkehren willst, kannst du einfach wieder den main-Branch auschecken (<code>git checkout main</code>)).</li>


<li><strong>Projekt in VS Code öffnen:</strong> Öffne VS Code und wähle <code>File &gt; Open Folder...</code> und navigiere zum <code>flutter_weather_app_blog</code>-Ordner.</li>


<li><strong>Abhängigkeiten installieren:</strong> Öffne ein Terminal in VS Code (<code>Terminal &gt; New Terminal</code>) und führe aus:<br><code>flutter pub get</code></li>


<li><strong>Code generieren:</strong> Da wir Riverpod mit Code-Generierung verwenden, müssen wir diesen Schritt ausführen:<br><code>dart run build_runner build --delete-conflicting-outputs</code><br>Dieser Befehl liest spezielle Anmerkungen (<code>@riverpod</code>) im Code und erstellt automatisch benötigte Hilfsdateien (die auf <code>.g.dart</code> enden).</li>
</ol>


<p class="wp-block-paragraph">Jetzt ist der Code bereit zur Untersuchung!</p>


<p class="wp-block-paragraph"><strong>Schritt 2: Der große Überblick – Die Architektur</strong></p>


<p class="wp-block-paragraph">Bevor wir in einzelne Dateien schauen, betrachten wir den Bauplan. Unsere App folgt einer <strong>Schichtenarchitektur</strong>, inspiriert von &#8222;Clean Architecture&#8220;. Stell dir vor, wir bauen Schichten wie bei einer Zwiebel:</p>


<pre class="EnlighterJSRAW" data-enlighter-language="generic" data-enlighter-theme="" data-enlighter-highlight="" data-enlighter-linenumbers="" data-enlighter-lineoffset="" data-enlighter-title="" data-enlighter-group="">+-------------------------------------------------+
| Presentation (UI) Layer                         | &lt;--- Das, was der Nutzer sieht (Widgets, Screens)
|    - Widgets                                    |      Interagiert mit dem Application Layer
|    - Screens                                    |
|    - State Management (Notifier/Provider)       |
+-------------------------------------------------+
      ^                                      | Dependency Rule
      | Calls                                | (Innere Schichten kennen Äußere nicht)
+-------------------------------------------------+
| Application / Domain Layer                      | &lt;--- Die Logik der App
|    - State Notifier (Logik-Orchestrierung)      |      Definiert, WAS die App tut
|    - Repository Interface (Datenvertrag)        |      Kennt nur Entities
|    - Entities (App-Datenstrukturen)             |
+-------------------------------------------------+
      ^                                      |
      | Implements / Calls                   |
+-------------------------------------------------+
| Data Layer                                      | &lt;--- Datenbeschaffung &amp; -speicherung
|    - Repository Implementation                  |      Implementiert den Vertrag
|    - Data Sources (API, GPS, DB)                |      Spricht mit der Außenwelt
|    - Models (API/DB-Datenstrukturen)            |
+-------------------------------------------------+
      ^ Depends on                             ^ Depends on
      |                                        |
+-------------------------------------------------+
| Core Layer                                      | &lt;--- App-übergreifende Helfer
|    - Utils (Logger, Formatter)                  |      Von allen Schichten nutzbar
|    - Error Handling                             |
|    - Networking Client                          |
+-------------------------------------------------+</pre>


<ul class="wp-block-list">
<li><strong>Core:</strong> Enthält grundlegende Helferlein, die überall gebraucht werden könnten (wie unser Logger).</li>


<li><strong>Data:</strong> Kümmert sich darum, <em>woher</em> die Daten kommen (API, GPS) und <em>wie</em> sie technisch abgefragt werden. Kennt die genaue Struktur der externen Daten.</li>


<li><strong>Domain/Application:</strong> Das Herzstück. Definiert, <em>welche</em> Daten die App braucht (<code>Entities</code>) und <em>welche</em> Operationen möglich sind (<code>Repository Interface</code>), aber nicht, wie sie beschafft werden. Hier sitzt auch die Logik, die auf Nutzeraktionen reagiert (<code>Notifier</code>). Diese Schicht sollte unabhängig von UI-Details oder spezifischen Datenbanken/APIs sein.</li>


<li><strong>Presentation (UI):</strong> Zeigt die Daten an (<code>Screens</code>, <code>Widgets</code>) und nimmt Nutzereingaben entgegen. Sie spricht nur mit dem Application Layer (über den Notifier), um Daten zu bekommen oder Aktionen auszulösen.</li>
</ul>


<p class="wp-block-paragraph"><strong>Die goldene Regel:</strong> Abhängigkeiten zeigen immer nach innen! Die UI kennt die Application/Domain Layer, aber nicht die Data Layer. Die Domain Layer kennt niemanden außerhalb (außer Core). Das macht das System flexibel und testbar.</p>


<p class="wp-block-paragraph"><strong>Schritt 3: Ein Rundgang durch die Ordner (<code>lib/src/</code>)</strong></p>


<p class="wp-block-paragraph">Schauen wir uns an, wie diese Architektur in unserer Ordnerstruktur abgebildet ist:</p>


<ul class="wp-block-list">
<li><strong><code>lib/main.dart</code>:</strong> Der allererste Startpunkt. Initialisiert das Logging, <code>WidgetsFlutterBinding</code> (wichtig für Plugins) und startet die App innerhalb einer <code>ProviderScope</code> (notwendig für Riverpod).</li>


<li><strong><code>lib/app.dart</code>:</strong> Enthält das <code>MaterialApp</code>-Widget, das die grundlegende Struktur, das Theme (Aussehen) und die Startseite (<code>WeatherScreen</code>) unserer App definiert.</li>


<li><strong><code>lib/src/core/</code>:</strong> Unser Fundament.
<ul class="wp-block-list">
<li><strong><code>error/</code>:</strong> Enthält <code>exceptions.dart</code> (spezifische technische Fehler wie <code>NetworkException</code>) und <code>failure.dart</code> (abstraktere Fehler wie <code>NetworkFailure</code>, die die Logik verstehen kann). Diese Trennung hilft, Fehler sauber zu behandeln.</li>


<li><strong><code>location/</code>:</strong> <code>location_service.dart</code> kapselt die Interaktion mit dem <code>geolocator</code>-Paket. Alle GPS- und Berechtigungs-Anfragen laufen hierüber. Wird über Riverpod bereitgestellt (<code>locationServiceProvider</code>).</li>


<li><strong><code>networking/</code>:</strong> <code>http_client.dart</code> stellt eine globale Instanz des <code>http.Client</code> bereit (über <code>httpClientProvider</code>). Das macht es einfach, ihn in Tests durch einen Mock zu ersetzen.</li>


<li><strong><code>utils/</code>:</strong> Enthält Helfer wie <code>logger.dart</code> (für strukturierte Logs) und <code>date_formatter.dart</code> (um z.B. die Uhrzeit anzuzeigen).</li>


<li><strong><code>constants/</code>:</strong> <code>app_constants.dart</code> sammelt zentrale Konstanten (hier erstmal nur <code>myLocationLabel</code>).</li>
</ul>
</li>


<li><strong><code>lib/src/features/weather/</code>:</strong> Alles, was mit der Wetterfunktion zu tun hat.
<ul class="wp-block-list">
<li><strong><code>data/</code>:</strong> Datenbeschaffung.
<ul class="wp-block-list">
<li><strong><code>models/</code>:</strong> <code>current_weather_model.dart</code>, <code>forecast_response_model.dart</code>. Diese Dart-Klassen spiegeln <em>exakt</em> die Struktur des JSON wider, das wir von der Open-Meteo API bekommen. Sie enthalten <code>fromJson</code>-Methoden, um JSON in Dart-Objekte umzuwandeln.</li>


<li><strong><code>datasources/</code>:</strong> <code>weather_api_service.dart</code>. Spricht über den <code>http.Client</code> mit der Open-Meteo API (<code>getCurrentWeather</code>-Methode). Parst die JSON-Antwort mithilfe der <code>Models</code> und wirft spezifische <code>Exceptions</code> (<code>ApiException</code>, <code>NetworkException</code>, <code>DataParsingException</code>). Wird über Riverpod bereitgestellt (<code>weatherApiServiceProvider</code>).</li>


<li><strong><code>repositories/</code>:</strong> <code>weather_repository_impl.dart</code>. Die <em>konkrete</em> Implementierung unseres Datenvertrags. Diese Klasse kennt den <code>WeatherApiService</code> und den <code>LocationService</code>. Sie ruft deren Methoden auf, fängt deren <code>Exceptions</code> ab und wandelt sie in <code>Failures</code> um (z.B. wird <code>NetworkException</code> zu <code>NetworkFailure</code>). Sie wandelt auch die API-<code>Models</code> in die App-internen <code>Entities</code> um. Wird über Riverpod bereitgestellt (<code>weatherRepositoryProvider</code>).</li>
</ul>
</li>


<li><strong><code>domain/</code>:</strong> Das Kernstück der App-Logik.
<ul class="wp-block-list">
<li><strong><code>entities/</code>:</strong> <code>location_info.dart</code>, <code>current_weather_data.dart</code>. Einfache Dart-Klassen, die die Daten repräsentieren, <em>wie sie die App intern benötigt</em>, unabhängig von der API. Nutzen <code>Equatable</code> für einfache Vergleiche.</li>


<li><strong><code>repositories/</code>:</strong> <code>weather_repository.dart</code>. Das ist nur ein &#8222;Interface&#8220; (abstrakte Klasse). Es definiert, <em>was</em> man mit Wetterdaten tun können muss (z.B. <code>getWeatherForLocation</code>, <code>getCurrentLocationCoordinates</code>), aber nicht <em>wie</em>. Das ist der Vertrag, den die <code>WeatherRepositoryImpl</code> erfüllen muss.</li>
</ul>
</li>


<li><strong><code>application/</code>:</strong> Die Orchestrierung.
<ul class="wp-block-list">
<li><strong><code>weather_state.dart</code>:</strong> Definiert, wie der Zustand des Wetter-Features aussieht: ein <code>enum WeatherStatus</code> (initial, loading, success, failure), die eigentlichen <code>CurrentWeatherData</code>, der <code>selectedLocation</code> und ein optionales <code>Failure</code>-Objekt. Nutzt <code>Equatable</code> und <code>copyWith</code>.</li>


<li><strong><code>weather_notifier.dart</code>:</strong> Die Steuerzentrale. Ein <code>StateNotifier</code>, der den <code>WeatherState</code> hält und aktualisiert. Er bekommt das <code>WeatherRepository</code> übergeben (Dependency Injection durch Riverpod). Enthält die Logik für <code>fetchWeatherForCurrentLocation</code> und <code>refreshWeatherData</code>. Er ruft Methoden im Repository auf, behandelt das <code>Either&lt;Failure, Success&gt;</code>-Ergebnis und aktualisiert den <code>state</code> entsprechend.</li>
</ul>
</li>


<li><strong><code>presentation/</code>:</strong> Die Benutzeroberfläche.
<ul class="wp-block-list">
<li><strong><code>providers/</code>:</strong> <code>weather_providers.dart</code>. Definiert den <code>weatherNotifierProvider</code>, der den <code>WeatherNotifier</code> erstellt und der UI zur Verfügung stellt.</li>


<li><strong><code>widgets/</code>:</strong> Kleine, wiederverwendbare UI-Teile. <code>location_header.dart</code> zeigt den Ortsnamen, <code>current_temperature_display.dart</code> zeigt die Temperatur und Zeit. Sie bekommen ihre Daten von außen übergeben.</li>


<li><strong><code>screens/</code>:</strong> <code>weather_screen.dart</code>. Der Hauptbildschirm. Ein <code>ConsumerStatefulWidget</code>, das über <code>ref.watch(weatherNotifierProvider)</code> den aktuellen <code>WeatherState</code> bekommt. Basierend auf dem <code>status</code> im State, zeigt es entweder einen Ladeindikator, die Wetter-Widgets oder eine Fehlermeldung (<code>_buildErrorWidget</code>). Es nutzt <code>ref.read(weatherNotifierProvider.notifier)</code> um Aktionen im Notifier auszulösen (initiales Laden, Refresh). Der <code>RefreshIndicator</code> ermöglicht Pull-to-Refresh. Der <code>AnimatedSwitcher</code> sorgt für weiche Übergänge.</li>
</ul>
</li>
</ul>
</li>
</ul>


<p class="wp-block-paragraph"><strong>Schritt 4: Den Datenfluss verstehen</strong></p>


<p class="wp-block-paragraph">Wie hängt das alles zusammen, wenn die App startet?</p>


<ol class="wp-block-list">
<li><strong>Start (<code>main.dart</code> -&gt; <code>app.dart</code> -&gt; <code>WeatherScreen</code>)</strong>: Die App wird initialisiert, <code>ProviderScope</code> wird erstellt. <code>WeatherScreen</code> wird angezeigt.</li>


<li><strong>Initial Load (<code>WeatherScreen.initState</code>)</strong>: Der Screen merkt, dass er neu ist (<code>initialState.status == WeatherStatus.initial</code>) und triggert über <code>ref.read(weatherNotifierProvider.notifier).fetchWeatherForCurrentLocation()</code> den Ladevorgang im Notifier.</li>


<li><strong>Loading State (<code>WeatherNotifier</code>)</strong>: Der Notifier setzt sofort seinen <code>state</code> auf <code>status: WeatherStatus.loading</code>.</li>


<li><strong>UI Reaction (<code>WeatherScreen</code>)</strong>: Da der Screen via <code>ref.watch</code> auf den State hört, wird er neu gebaut und zeigt jetzt (im <code>_buildContent</code>) einen Ladeindikator an.</li>


<li><strong>Get Coordinates (<code>WeatherNotifier</code> -&gt; <code>WeatherRepository</code> -&gt; <code>LocationService</code>)</strong>:
<ul class="wp-block-list">
<li>Notifier ruft <code>_weatherRepository.getCurrentLocationCoordinates()</code> auf.</li>


<li>Das Repo (<code>WeatherRepositoryImpl</code>) ruft <code>_locationService.getCurrentPosition()</code> auf.</li>


<li>Der <code>LocationService</code> interagiert mit dem <code>geolocator</code>, fragt ggf. nach Berechtigungen und holt die <code>Position</code>.</li>


<li>Wenn erfolgreich, gibt der Service die <code>Position</code> zurück. Wenn ein Fehler auftritt (z.B. Berechtigung verweigert), wirft er eine <code>LocationException</code>.</li>


<li>Das Repo fängt die <code>Exception</code>, wandelt sie ggf. in eine <code>Failure</code> (<code>PermissionFailure</code>, <code>LocationFailure</code>) um und gibt <code>Left(failure)</code> zurück. Bei Erfolg erstellt es <code>LocationInfo</code> und gibt <code>Right(locationInfo)</code> zurück.</li>
</ul>
</li>


<li><strong>Handle Coordinates Result (<code>WeatherNotifier</code>)</strong>:
<ul class="wp-block-list">
<li>Der Notifier erhält das <code>Either</code>. Bei <code>Left(failure)</code> setzt er den <code>state</code> auf <code>status: WeatherStatus.failure</code> mit dem <code>failure</code>-Objekt -&gt; Die UI zeigt die Fehlermeldung.</li>


<li>Bei <code>Right(locationInfo)</code> geht es weiter. Der Notifier versucht noch, den Namen via <code>_weatherRepository.getLocationDisplayName</code> zu holen (was in Teil 3 noch nicht viel tut) und ruft dann <code>_fetchWeatherDataAndUpdateState(finalLocationInfo)</code> auf.</li>
</ul>
</li>


<li><strong>Get Weather Data (<code>WeatherNotifier</code> -&gt; <code>WeatherRepository</code> -&gt; <code>WeatherApiService</code>)</strong>:
<ul class="wp-block-list">
<li>Notifier ruft <code>_weatherRepository.getWeatherForLocation(locationInfo)</code> auf.</li>


<li>Das Repo (<code>WeatherRepositoryImpl</code>) ruft <code>_apiService.getCurrentWeather(...)</code> auf.</li>


<li>Der <code>WeatherApiService</code> baut die URL, macht den <code>http.get</code>-Aufruf, parst das JSON in <code>ForecastResponseModel</code>, extrahiert <code>CurrentWeatherModel</code>. Bei Fehlern (Netzwerk, API-Status, Parsing) wirft er <code>NetworkException</code>, <code>ApiException</code>, <code>DataParsingException</code>.</li>


<li>Das Repo fängt diese <code>Exceptions</code>, wandelt sie in <code>Failures</code> (<code>NetworkFailure</code>, <code>ServerFailure</code>) um und gibt <code>Left(failure)</code> zurück. Bei Erfolg wandelt es <code>CurrentWeatherModel</code> in <code>CurrentWeatherData</code> (unser App-Entity) um und gibt <code>Right(weatherData)</code> zurück.</li>
</ul>
</li>


<li><strong>Handle Weather Result (<code>WeatherNotifier</code>)</strong>:
<ul class="wp-block-list">
<li>Der Notifier erhält das <code>Either</code>. Bei <code>Left(failure)</code> setzt er den <code>state</code> auf <code>status: WeatherStatus.failure</code> mit dem <code>failure</code>-Objekt -&gt; Die UI zeigt die Fehlermeldung.</li>


<li>Bei <code>Right(weatherData)</code> setzt er den <code>state</code> auf <code>status: WeatherStatus.success</code>, speichert <code>weatherData</code> und <code>locationInfo</code> im State und löscht den Fehler (<code>clearError: true</code>).</li>
</ul>
</li>


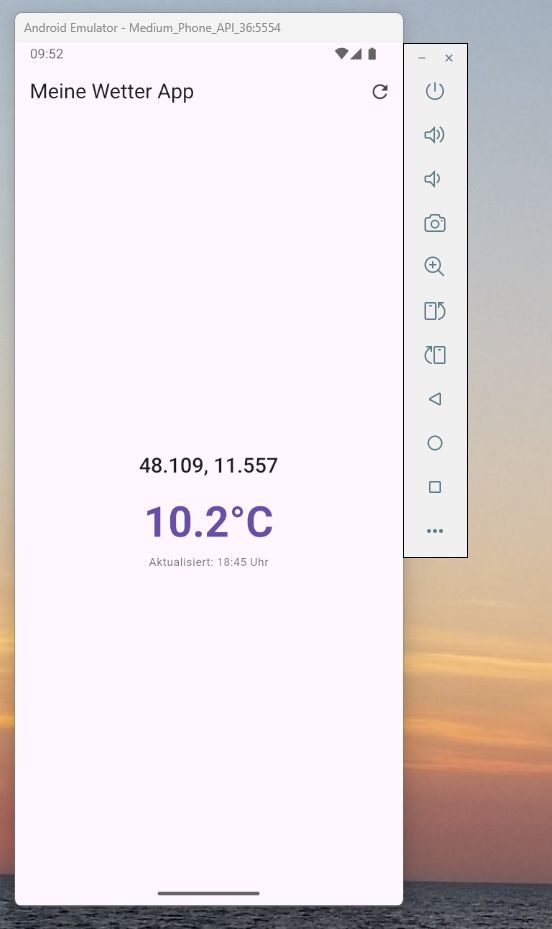
<li><strong>UI Reaction (<code>WeatherScreen</code>)</strong>: Der Screen hört wieder auf die State-Änderung (<code>ref.watch</code>). Er wird neu gebaut, <code>_buildContent</code> erkennt <code>WeatherStatus.success</code> und zeigt jetzt <code>LocationHeader</code> und <code>CurrentTemperatureDisplay</code> mit den Daten aus dem <code>state</code> an.</li>
</ol>


<p class="wp-block-paragraph"><strong>Schritt 5: Schlüsselkonzepte im Code</strong></p>


<ul class="wp-block-list">
<li><strong>Riverpod für State Management &amp; Dependency Injection:</strong>
<ul class="wp-block-list">
<li><code>ProviderScope</code> (in <code>main.dart</code>): Macht Provider global verfügbar.</li>


<li><code>@riverpod</code> / <code>...Provider</code> (z.B. in <code>location_service.dart</code>, <code>weather_repository_impl.dart</code>): Definiert, <em>wie</em> eine Instanz eines Service oder Repositories erstellt wird. Riverpod kümmert sich darum, dass nur eine Instanz erstellt und wiederverwendet wird. Das ist <strong>Dependency Injection</strong>: Komponenten bekommen ihre Abhängigkeiten (wie den <code>http.Client</code> oder den <code>LocationService</code>) &#8222;injiziert&#8220;, statt sie selbst zu erstellen.</li>


<li><code>StateNotifierProvider</code> (<code>weather_providers.dart</code>): Ein spezieller Provider für unseren <code>WeatherNotifier</code>, der dessen Zustand (<code>WeatherState</code>) verwaltet.</li>


<li><code>ConsumerWidget</code> / <code>ConsumerStatefulWidget</code> (<code>WeatherScreen</code>): Widgets, die auf Provider &#8222;hören&#8220; können.</li>


<li><code>ref.watch()</code> (im <code>build</code> von <code>WeatherScreen</code>): Liest den Wert eines Providers und <strong>baut das Widget neu</strong>, wenn sich der Wert (hier der <code>WeatherState</code>) ändert.</li>


<li><code>ref.read()</code> (im <code>initState</code> oder in Callbacks wie <code>onPressed</code> von <code>WeatherScreen</code>): Liest den Wert eines Providers <em>einmalig</em>, ohne auf Änderungen zu hören. Wird verwendet, um Methoden im Notifier aufzurufen.</li>
</ul>
</li>


<li><strong>Fehlerbehandlung (<code>Either</code>, <code>Failure</code>, <code>Exception</code>):</strong>
<ul class="wp-block-list">
<li>Services (<code>LocationService</code>, <code>WeatherApiService</code>) werfen spezifische <code>Exceptions</code> bei technischen Problemen.</li>


<li>Das Repository (<code>WeatherRepositoryImpl</code>) fängt diese <code>Exceptions</code> und wandelt sie in allgemeinere <code>Failures</code> um. Es gibt das Ergebnis als <code>Either&lt;Failure, Success&gt;</code> zurück – ein klarer Weg, um Erfolg oder Misserfolg zu signalisieren, ohne Exceptions durch die ganze App zu werfen.</li>


<li>Der Notifier (<code>WeatherNotifier</code>) behandelt das <code>Either</code>-Ergebnis und aktualisiert den <code>WeatherState</code> entsprechend (<code>status: WeatherStatus.failure</code> oder <code>success</code>).</li>


<li>Die UI (<code>WeatherScreen</code>) reagiert auf den <code>status</code> und das <code>error</code>-Feld im State und zeigt die passende Ansicht.</li>
</ul>
</li>


<li><strong>Asynchronität (<code>Future</code>, <code>async</code>, <code>await</code>):</strong> Netzwerk- und GPS-Anfragen dauern eine Weile. <code>Future</code> repräsentiert einen Wert, der <em>irgendwann</em> verfügbar sein wird. <code>async</code> markiert eine Funktion, die <code>await</code> verwenden kann. <code>await</code> pausiert die Ausführung der Funktion, bis der <code>Future</code> abgeschlossen ist, ohne die gesamte App zu blockieren. Wir sehen das intensiv im Notifier, Repository und den Services.</li>


<li><strong>Immutability &amp; Equatable:</strong> Der <code>WeatherState</code> wird nie direkt geändert. Stattdessen wird mit <code>copyWith</code> eine <em>neue</em> Instanz mit den geänderten Werten erstellt. Das macht den Zustandsfluss vorhersagbar. <code>Equatable</code> hilft Riverpod (und uns beim Testen), effizient zu erkennen, ob sich der Zustand <em>wirklich</em> geändert hat, indem es Objekte anhand ihrer Eigenschaften vergleicht, nicht nur anhand ihrer Speicheradresse.</li>
</ul>


<figure class="wp-block-image size-full"><img decoding="async" width="552" height="929" data-attachment-id="233" data-permalink="https://allround-blog.de/software/deine-flutter-wetter-app-schritt-fuer-schritt-teil-3/attachment/clipboard01/" data-orig-file="https://allround-blog.de/wp-content/uploads/2025/04/Clipboard01.jpg" data-orig-size="552,929" data-comments-opened="1" data-image-meta="{&quot;aperture&quot;:&quot;0&quot;,&quot;credit&quot;:&quot;&quot;,&quot;camera&quot;:&quot;&quot;,&quot;caption&quot;:&quot;&quot;,&quot;created_timestamp&quot;:&quot;0&quot;,&quot;copyright&quot;:&quot;&quot;,&quot;focal_length&quot;:&quot;0&quot;,&quot;iso&quot;:&quot;0&quot;,&quot;shutter_speed&quot;:&quot;0&quot;,&quot;title&quot;:&quot;&quot;,&quot;orientation&quot;:&quot;0&quot;}" data-image-title="App Teil 3" data-image-description="" data-image-caption="" data-large-file="https://allround-blog.de/wp-content/uploads/2025/04/Clipboard01.jpg" src="https://allround-blog.de/wp-content/uploads/2025/04/Clipboard01.jpg" alt="" class="wp-image-233" srcset="https://allround-blog.de/wp-content/uploads/2025/04/Clipboard01.jpg 552w, https://allround-blog.de/wp-content/uploads/2025/04/Clipboard01-178x300.jpg 178w" sizes="(max-width: 552px) 100vw, 552px" /></figure>


<p class="wp-block-paragraph"><strong>Schritt 6: Ausführen und Experimentieren!</strong></p>


<p class="wp-block-paragraph">Jetzt, wo du eine Vorstellung davon hast, wie der Code aufgebaut ist und funktioniert:</p>


<ol class="wp-block-list">
<li><strong>Starte die App:</strong> Wähle dein Gerät in VS Code und drücke <code>F5</code>.</li>


<li><strong>Beobachte:</strong> Verfolge die Log-Ausgaben im &#8222;DEBUG CONSOLE&#8220;-Fenster von VS Code. Du solltest die Meldungen von <code>AppLogger</code> aus den verschiedenen Schichten sehen.</li>


<li><strong>Experimentiere:</strong>
<ul class="wp-block-list">
<li>Ändere Texte in den Widgets.</li>


<li>Setze Haltepunkte (Breakpoints) in VS Code (klicke links neben die Zeilennummer) in verschiedenen Methoden (z.B. im Notifier, im Repo, im Service) und starte die App im Debug-Modus (<code>F5</code>). Steppe durch den Code (<code>F10</code>, <code>F11</code>), um den Fluss live zu sehen.</li>


<li>Simuliere Fehler: Wirf testweise eine Exception im <code>WeatherApiService</code> oder gib <code>Left(NetworkFailure())</code> im Repository zurück, um zu sehen, wie die Fehlerbehandlung in der UI greift.</li>
</ul>
</li>
</ol>


<p class="wp-block-paragraph"><strong>Zusammenfassung und Nächste Schritte</strong></p>


<p class="wp-block-paragraph">Das war ein tiefer Einblick in den Code unseres ersten Meilensteins! Du hast gesehen, wie wir mit einer klaren Architektur und Werkzeugen wie Riverpod eine skalierbare und testbare Grundlage geschaffen haben, auch für eine zunächst einfache Funktion. Du verstehst jetzt (hoffentlich!) besser:</p>


<ul class="wp-block-list">
<li>Die Aufteilung in Schichten (Presentation, Domain/Application, Data, Core).</li>


<li>Die Verantwortlichkeiten der einzelnen Komponenten (Widgets, Notifier, Repositories, Services).</li>


<li>Den Daten- und Kontrollfluss durch die App.</li>


<li>Die Grundprinzipien von State Management, Fehlerbehandlung und Asynchronität in Flutter.</li>
</ul>


<p class="wp-block-paragraph">Im <strong>nächsten Teil (Teil 4)</strong> bauen wir darauf auf und machen die App interaktiver: Wir fügen die <strong>Adresssuche</strong> hinzu!</p>


<p class="wp-block-paragraph">Bleib dran und viel Spaß beim Erkunden des Codes!</p>


<hr class="wp-block-separator has-alpha-channel-opacity"/>


<p class="wp-block-paragraph"><strong>Weiterführende Ressourcen &amp; Vertiefung (für Teil 3)</strong></p>


<p class="wp-block-paragraph">Dieser Teil hat viele grundlegende Konzepte der Flutter-Entwicklung eingeführt. Hier sind Links zum Vertiefen:</p>


<ol class="wp-block-list">
<li><strong>Projektstruktur &amp; Architektur:</strong>
<ul class="wp-block-list">
<li><strong>Flutter App architecture samples (GitHub):</strong> <a href="https://github.com/flutter/samples/tree/main/experimental/context_menus">https://github.com/flutter/samples/tree/main/experimental/context_menus</a> (Beispielhaft, es gibt viele Ansätze) &#8211; Oft komplex, aber gibt Ideen. Unsere Struktur ist eine vereinfachte Form, die oft als &#8222;Feature-First&#8220; mit Schichtentrennung bezeichnet wird.</li>


<li><strong>Clean Architecture in Flutter (Artikel/Videos):</strong> Suche nach &#8222;Clean Architecture Flutter&#8220; für verschiedene Interpretationen und Erklärungen (z.B. von Reso Coder, Vandad Nahavandipoor).</li>
</ul>
</li>


<li><strong>Flutter Pakete (Dependencies):</strong>
<ul class="wp-block-list">
<li><strong>Pakete verwenden (Offizielle Doku):</strong> <a href="https://docs.flutter.dev/packages-and-plugins/using-packages">https://docs.flutter.dev/packages-and-plugins/using-packages</a> &#8211; Wie man Pakete in <code>pubspec.yaml</code> hinzufügt und nutzt.</li>


<li><strong><code>http</code> Paket:</strong> <a href="https://pub.dev/packages/http">https://pub.dev/packages/http</a> &#8211; Für Netzwerk-Anfragen.</li>


<li><strong><code>geolocator</code> Paket:</strong> <a href="https://pub.dev/packages/geolocator">https://pub.dev/packages/geolocator</a> &#8211; Für GPS-Zugriff und Berechtigungen.</li>


<li><strong><code>logging</code> Paket:</strong> <a href="https://pub.dev/packages/logging">https://pub.dev/packages/logging</a> &#8211; Für strukturiertes Logging.</li>


<li><strong><code>intl</code> Paket:</strong> <a href="https://pub.dev/packages/intl">https://pub.dev/packages/intl</a> &#8211; Für Internationalisierung und Formatierung (Datum, Zahlen).</li>


<li><strong><code>equatable</code> Paket:</strong> <a href="https://pub.dev/packages/equatable">https://pub.dev/packages/equatable</a> &#8211; Vereinfacht das Überschreiben von <code>==</code> und <code>hashCode</code> für Wert-Vergleiche.</li>
</ul>
</li>


<li><strong>State Management (Riverpod):</strong>
<ul class="wp-block-list">
<li><strong>Offizielle Riverpod Dokumentation:</strong> <a href="https://riverpod.dev/">https://riverpod.dev/</a> &#8211; Die beste Quelle! Beginne mit &#8222;Getting Started&#8220;.</li>


<li><strong>Provider Typen (Übersicht):</strong> <a href="https://riverpod.dev/docs/concepts/providers">https://riverpod.dev/docs/concepts/providers</a> &#8211; Erklärt <code>Provider</code>, <code>StateNotifierProvider</code> etc.</li>


<li><strong><code>ref.watch</code> vs <code>ref.read</code>:</strong> <a href="https://riverpod.dev/docs/concepts/reading_providers">https://riverpod.dev/docs/concepts/reading_providers</a> &#8211; Ein fundamentales Konzept in Riverpod.</li>


<li><strong>Code Generierung:</strong> <a href="https://riverpod.dev/docs/concepts/code_generation">https://riverpod.dev/docs/concepts/code_generation</a> &#8211; Erklärung, wie <code>@riverpod</code> und <code>build_runner</code> funktionieren.</li>
</ul>
</li>


<li><strong>Dart Grundlagen:</strong>
<ul class="wp-block-list">
<li><strong>Asynchrones Programmieren (<code>Future</code>, <code>async</code>, <code>await</code>):</strong> <a href="https://dart.dev/codelabs/async-await">https://dart.dev/codelabs/async-await</a> &#8211; Essentiell für Netzwerk- und Geräte-Interaktionen.</li>


<li><strong>Fehlerbehandlung (<code>try-catch</code>, <code>Exceptions</code>):</strong> <a href="https://dart.dev/guides/language/language-tour#exceptions">https://dart.dev/guides/language/language-tour#exceptions</a></li>
</ul>
</li>


<li><strong>Android Spezifika:</strong>
<ul class="wp-block-list">
<li><strong>App Manifest (<code>AndroidManifest.xml</code>):</strong> <a href="https://developer.android.com/guide/topics/manifest/manifest-intro">https://developer.android.com/guide/topics/manifest/manifest-intro</a> &#8211; Grundlegende Informationen zur Manifest-Datei.</li>


<li><strong>Berechtigungen unter Android:</strong> <a href="https://developer.android.com/guide/topics/permissions/overview">https://developer.android.com/guide/topics/permissions/overview</a></li>
</ul>
</li>
</ol>
							
	</div><!-- .post-content -->
				
		
		<div class="post-meta-bottom">

																		
				<p class="post-categories"><span class="category-icon"><span class="front-flap"></span></span> <a href="https://allround-blog.de/category/software/" rel="category tag">Software</a>, <a href="https://allround-blog.de/category/wetter/" rel="category tag">Wetter</a>, <a href="https://allround-blog.de/category/wetter-app-entwicklung/" rel="category tag">Wetter-App Entwicklung</a></p>
	
						
							<p class="post-tags"><a href="https://allround-blog.de/tag/android/" rel="tag">Android</a><a href="https://allround-blog.de/tag/dart/" rel="tag">Dart</a><a href="https://allround-blog.de/tag/flutter/" rel="tag">Flutter</a></p>
						
												
				<nav class="post-nav group">
											
											<a class="post-nav-older" href="https://allround-blog.de/software/deine-flutter-wetter-app-schritt-fuer-schritt-teil-2/">
							<h5>Vorheriger Beitrag</h5>
							Deine Flutter Wetter-App: Schritt für Schritt – Teil 2						</a>
										
											<a class="post-nav-newer" href="https://allround-blog.de/software/deine-flutter-wetter-app-schritt-fuer-schritt-teil-4/">
							<h5>Nächster Beitrag</h5>
							Deine Flutter Wetter-App: Schritt für Schritt – Teil 4						</a>
					
				</nav><!-- .post-nav -->

											
		</div><!-- .post-meta-bottom -->

		
	<div class="comments">
	
		<a name="comments"></a>
			
		<h2 class="comments-title">
		
			0 Kommentare			
		</h2>

		<ol class="commentlist">
					</ol>
		
				
			<div class="pingbacks">
			
				<div class="pingbacks-inner">
			
					<h3 class="pingbacks-title">
					
						1 Pingback					
					</h3>
				
					<ol class="pingback-list">
								
		<li class="pingback even thread-even depth-1" id="comment-15">
		
			 <a href="https://allround-blog.de/software/deine-flutter-wetter-app-schritt-fuer-schritt-teil-4/" class="url" rel="ugc">Deine Flutter Wetter-App: Schritt für Schritt – Teil 4 &#8211; Allround-Blog</a> 			
		</li>
		</li><!-- #comment-## -->
					</ol>
					
				</div>
				
			</div>


	</div><!-- /comments -->
	
		<div id="respond" class="comment-respond">
		<h3 id="reply-title" class="comment-reply-title">Schreibe einen Kommentar <small><a rel="nofollow" id="cancel-comment-reply-link" href="/software/deine-flutter-wetter-app-schritt-fuer-schritt-teil-3/#respond" style="display:none;">Antworten abbrechen</a></small></h3><form action="https://allround-blog.de/wp-comments-post.php" method="post" id="commentform" class="comment-form"><p class="comment-notes"><span id="email-notes">Deine E-Mail-Adresse wird nicht veröffentlicht.</span> <span class="required-field-message">Erforderliche Felder sind mit <span class="required">*</span> markiert</span></p><p class="comment-form-comment"><label for="comment">Kommentar <span class="required">*</span></label> <textarea autocomplete="new-password"  id="i2e14f2f51"  name="i2e14f2f51"   cols="45" rows="8" maxlength="65525" required="required"></textarea><textarea id="comment" aria-label="hp-comment" aria-hidden="true" name="comment" autocomplete="new-password" style="padding:0 !important;clip:rect(1px, 1px, 1px, 1px) !important;position:absolute !important;white-space:nowrap !important;height:1px !important;width:1px !important;overflow:hidden !important;" tabindex="-1"></textarea><script data-noptimize>document.getElementById("comment").setAttribute( "id", "a63f2e1c1474a60af084f8567198192a" );document.getElementById("i2e14f2f51").setAttribute( "id", "comment" );</script></p><p class="comment-form-author"><label for="author">Name <span class="required">*</span></label> <input id="author" name="author" type="text" value="" size="30" maxlength="245" autocomplete="name" required="required" /></p>
<p class="comment-form-email"><label for="email">E-Mail <span class="required">*</span></label> <input id="email" name="email" type="text" value="" size="30" maxlength="100" aria-describedby="email-notes" autocomplete="email" required="required" /></p>
<p class="comment-form-url"><label for="url">Website</label> <input id="url" name="url" type="text" value="" size="30" maxlength="200" autocomplete="url" /></p>
<p class="comment-form-cookies-consent"><input id="wp-comment-cookies-consent" name="wp-comment-cookies-consent" type="checkbox" value="yes" /> <label for="wp-comment-cookies-consent">Meinen Namen, meine E-Mail-Adresse und meine Website in diesem Browser für die nächste Kommentierung speichern.</label></p>
<p class="form-submit"><input name="submit" type="submit" id="submit" class="submit" value="Kommentar abschicken" /> <input type='hidden' name='comment_post_ID' value='228' id='comment_post_ID' />
<input type='hidden' name='comment_parent' id='comment_parent' value='0' />
</p></form>	</div><!-- #respond -->
	
</article><!-- .post -->			
		</div><!-- .posts -->
	
	</div><!-- .content -->


	<div class="sidebar right" role="complementary">
		<div id="block-2" class="widget widget_block widget_search"><div class="widget-content"><form role="search" method="get" action="https://allround-blog.de/" class="wp-block-search__button-outside wp-block-search__text-button wp-block-search"    ><label class="wp-block-search__label" for="wp-block-search__input-1" >Suchen</label><div class="wp-block-search__inside-wrapper" ><input class="wp-block-search__input" id="wp-block-search__input-1" placeholder="" value="" type="search" name="s" required /><button aria-label="Suchen" class="wp-block-search__button wp-element-button" type="submit" >Suchen</button></div></form></div></div><div id="block-3" class="widget widget_block"><div class="widget-content">
<div class="wp-block-group"><div class="wp-block-group__inner-container is-layout-flow wp-block-group-is-layout-flow">
<h2 class="wp-block-heading">Neueste Beiträge</h2>


<ul class="wp-block-latest-posts__list wp-block-latest-posts"><li><a class="wp-block-latest-posts__post-title" href="https://allround-blog.de/gesundheit/haferflocken-und-gesundheit-3/">Haferflocken und Gesundheit: Vorteile, Nährstoffe &amp; Tipps</a></li>
<li><a class="wp-block-latest-posts__post-title" href="https://allround-blog.de/software/deine-flutter-wetter-app-schritt-fuer-schritt-teil-6/">Deine Flutter Wetter-App: Schritt für Schritt – Teil 6</a></li>
<li><a class="wp-block-latest-posts__post-title" href="https://allround-blog.de/software/deine-flutter-wetter-app-schritt-fuer-schritt-teil-5/">Deine Flutter Wetter-App: Schritt für Schritt – Teil 5</a></li>
<li><a class="wp-block-latest-posts__post-title" href="https://allround-blog.de/software/deine-flutter-wetter-app-schritt-fuer-schritt-teil-4/">Deine Flutter Wetter-App: Schritt für Schritt – Teil 4</a></li>
<li><a class="wp-block-latest-posts__post-title" href="https://allround-blog.de/software/deine-flutter-wetter-app-schritt-fuer-schritt-teil-3/">Deine Flutter Wetter-App: Schritt für Schritt – Teil 3</a></li>
</ul></div></div>
</div></div><div id="block-4" class="widget widget_block"><div class="widget-content">
<div class="wp-block-group"><div class="wp-block-group__inner-container is-layout-flow wp-block-group-is-layout-flow">
<h2 class="wp-block-heading">Neueste Kommentare</h2>


<ol class="wp-block-latest-comments"><li class="wp-block-latest-comments__comment"><article><footer class="wp-block-latest-comments__comment-meta"><a class="wp-block-latest-comments__comment-author" href="https://allround-blog.de/software/deine-flutter-wetter-app-schritt-fuer-schritt-teil-6/">Deine Flutter Wetter-App: Schritt für Schritt – Teil 6 &#8211; Allround-Blog</a> zu <a class="wp-block-latest-comments__comment-link" href="https://allround-blog.de/software/deine-flutter-wetter-app-schritt-fuer-schritt-teil-5/#comment-17">Deine Flutter Wetter-App: Schritt für Schritt – Teil 5</a></footer></article></li><li class="wp-block-latest-comments__comment"><article><footer class="wp-block-latest-comments__comment-meta"><a class="wp-block-latest-comments__comment-author" href="https://allround-blog.de/software/deine-flutter-wetter-app-schritt-fuer-schritt-teil-5/">Deine Flutter Wetter-App: Schritt für Schritt – Teil 5 &#8211; Allround-Blog</a> zu <a class="wp-block-latest-comments__comment-link" href="https://allround-blog.de/software/deine-flutter-wetter-app-schritt-fuer-schritt-teil-4/#comment-16">Deine Flutter Wetter-App: Schritt für Schritt – Teil 4</a></footer></article></li><li class="wp-block-latest-comments__comment"><article><footer class="wp-block-latest-comments__comment-meta"><a class="wp-block-latest-comments__comment-author" href="https://allround-blog.de/software/deine-flutter-wetter-app-schritt-fuer-schritt-teil-4/">Deine Flutter Wetter-App: Schritt für Schritt – Teil 4 &#8211; Allround-Blog</a> zu <a class="wp-block-latest-comments__comment-link" href="https://allround-blog.de/software/deine-flutter-wetter-app-schritt-fuer-schritt-teil-3/#comment-15">Deine Flutter Wetter-App: Schritt für Schritt – Teil 3</a></footer></article></li><li class="wp-block-latest-comments__comment"><article><footer class="wp-block-latest-comments__comment-meta"><a class="wp-block-latest-comments__comment-author" href="https://allround-blog.de/software/deine-flutter-wetter-app-schritt-fuer-schritt-teil-2/">Deine Flutter Wetter-App: Schritt für Schritt – Teil 2 &#8211; Allround-Blog</a> zu <a class="wp-block-latest-comments__comment-link" href="https://allround-blog.de/software/deine-flutter-wetter-app-schritt-fuer-schritt/#comment-14">Deine Flutter Wetter-App: Schritt für Schritt: Teil 1</a></footer></article></li><li class="wp-block-latest-comments__comment"><article><footer class="wp-block-latest-comments__comment-meta"><a class="wp-block-latest-comments__comment-author" href="https://allround-blog.de/software/deine-flutter-wetter-app-schritt-fuer-schritt/">Deine Flutter Wetter-App: Schritt für Schritt &#8211; Allround-Blog</a> zu <a class="wp-block-latest-comments__comment-link" href="https://allround-blog.de/imkerei/gruenlandtemperatursumme-und-ihre-bedeutung-fuer-die-imkerei/#comment-13">Frühling auf der Alb: Die Grünlandtemperatursumme als Kompass für Imker</a></footer></article></li></ol></div></div>
</div></div><div id="block-5" class="widget widget_block"><div class="widget-content">
<div class="wp-block-group"><div class="wp-block-group__inner-container is-layout-flow wp-block-group-is-layout-flow">
<h2 class="wp-block-heading">Archiv</h2>


<ul class="wp-block-archives-list wp-block-archives">	<li><a href='https://allround-blog.de/2026/03/'>März 2026</a></li>
	<li><a href='https://allround-blog.de/2025/06/'>Juni 2025</a></li>
	<li><a href='https://allround-blog.de/2025/05/'>Mai 2025</a></li>
	<li><a href='https://allround-blog.de/2025/04/'>April 2025</a></li>
	<li><a href='https://allround-blog.de/2025/03/'>März 2025</a></li>
	<li><a href='https://allround-blog.de/2024/11/'>November 2024</a></li>
	<li><a href='https://allround-blog.de/2024/10/'>Oktober 2024</a></li>
</ul></div></div>
</div></div><div id="block-6" class="widget widget_block"><div class="widget-content">
<div class="wp-block-group"><div class="wp-block-group__inner-container is-layout-flow wp-block-group-is-layout-flow">
<h2 class="wp-block-heading">Kategorien</h2>


<ul class="wp-block-categories-list wp-block-categories-taxonomy-category wp-block-categories">	<li class="cat-item cat-item-2"><a href="https://allround-blog.de/category/blogging/">Blogging</a>
</li>
	<li class="cat-item cat-item-8"><a href="https://allround-blog.de/category/dms/">DMS</a>
</li>
	<li class="cat-item cat-item-15"><a href="https://allround-blog.de/category/gesundheit/">Gesundheit</a>
</li>
	<li class="cat-item cat-item-14"><a href="https://allround-blog.de/category/imkerei/">Imkerei</a>
</li>
	<li class="cat-item cat-item-6"><a href="https://allround-blog.de/category/karten/">Karten</a>
</li>
	<li class="cat-item cat-item-3"><a href="https://allround-blog.de/category/software/">Software</a>
</li>
	<li class="cat-item cat-item-7"><a href="https://allround-blog.de/category/vermessung/">Vermessung</a>
</li>
	<li class="cat-item cat-item-25"><a href="https://allround-blog.de/category/wetter/">Wetter</a>
</li>
	<li class="cat-item cat-item-26"><a href="https://allround-blog.de/category/wetter-app-entwicklung/">Wetter-App Entwicklung</a>
</li>
	<li class="cat-item cat-item-16"><a href="https://allround-blog.de/category/wohlbefinden/">Wohlbefinden</a>
</li>
	<li class="cat-item cat-item-4"><a href="https://allround-blog.de/category/wordpress/">WordPress</a>
</li>
</ul></div></div>
</div></div>	</div><!-- .sidebar -->


</main><!-- .wrapper -->
		
<!--WPFC_FOOTER_START-->	<div class="footer section large-padding bg-dark">
		
		<div class="footer-inner section-inner group">
		
			<!-- .footer-a -->
				
			<!-- .footer-b -->
								
			<!-- .footer-c -->
					
		</div><!-- .footer-inner -->
	
	</div><!-- .footer -->
	
	<div class="credits section bg-dark no-padding">
	
		<div class="credits-inner section-inner group">
	
			<p class="credits-left">
				&copy; 2026 <a href="https://allround-blog.de">Allround-Blog</a>
			</p>
			
			<p class="credits-right">
				<span>Theme von <a href="https://andersnoren.se">Anders Norén</a></span> &mdash; <a title="Nach oben" class="tothetop">Hoch &uarr;</a>
			</p>
					
		</div><!-- .credits-inner -->
		
	</div><!-- .credits -->

</div><!-- .big-wrapper -->

<script type="speculationrules">
{"prefetch":[{"source":"document","where":{"and":[{"href_matches":"\/*"},{"not":{"href_matches":["\/wp-*.php","\/wp-admin\/*","\/wp-content\/uploads\/*","\/wp-content\/*","\/wp-content\/plugins\/*","\/wp-content\/themes\/hemingway\/*","\/*\\?(.+)"]}},{"not":{"selector_matches":"a[rel~=\"nofollow\"]"}},{"not":{"selector_matches":".no-prefetch, .no-prefetch a"}}]},"eagerness":"conservative"}]}
</script>
		<div id="jp-carousel-loading-overlay">
			<div id="jp-carousel-loading-wrapper">
				<span id="jp-carousel-library-loading"><svg class="jetpack-spinner" width="40" height="40" viewBox="0 0 100 100" xmlns="http://www.w3.org/2000/svg" aria-hidden="true" focusable="false"><circle cx="50" cy="50" r="46" fill="none" stroke="#ddd" stroke-width="8"/><path d="M 50 4 A 46 46 0 0 1 96 50" fill="none" stroke="currentColor" stroke-width="8" stroke-linecap="round"><animateTransform attributeName="transform" type="rotate" dur="1.4s" from="0 50 50" to="360 50 50" repeatCount="indefinite"/></path></svg></span>
			</div>
		</div>
		<div class="jp-carousel-overlay" style="display: none;">

		<div class="jp-carousel-container">
			<!-- The Carousel Swiper -->
			<div
				class="jp-carousel-wrap swiper jp-carousel-swiper-container jp-carousel-transitions"
				itemscope
				itemtype="https://schema.org/ImageGallery">
				<div class="jp-carousel swiper-wrapper"></div>
				<div class="jp-swiper-button-prev swiper-button-prev">
					<svg width="25" height="24" viewBox="0 0 25 24" fill="none" xmlns="http://www.w3.org/2000/svg">
						<mask id="maskPrev" mask-type="alpha" maskUnits="userSpaceOnUse" x="8" y="6" width="9" height="12">
							<path d="M16.2072 16.59L11.6496 12L16.2072 7.41L14.8041 6L8.8335 12L14.8041 18L16.2072 16.59Z" fill="white"/>
						</mask>
						<g mask="url(#maskPrev)">
							<rect x="0.579102" width="23.8823" height="24" fill="#FFFFFF"/>
						</g>
					</svg>
				</div>
				<div class="jp-swiper-button-next swiper-button-next">
					<svg width="25" height="24" viewBox="0 0 25 24" fill="none" xmlns="http://www.w3.org/2000/svg">
						<mask id="maskNext" mask-type="alpha" maskUnits="userSpaceOnUse" x="8" y="6" width="8" height="12">
							<path d="M8.59814 16.59L13.1557 12L8.59814 7.41L10.0012 6L15.9718 12L10.0012 18L8.59814 16.59Z" fill="white"/>
						</mask>
						<g mask="url(#maskNext)">
							<rect x="0.34375" width="23.8822" height="24" fill="#FFFFFF"/>
						</g>
					</svg>
				</div>
			</div>
			<!-- The main close buton -->
			<div class="jp-carousel-close-hint">
				<svg width="25" height="24" viewBox="0 0 25 24" fill="none" xmlns="http://www.w3.org/2000/svg">
					<mask id="maskClose" mask-type="alpha" maskUnits="userSpaceOnUse" x="5" y="5" width="15" height="14">
						<path d="M19.3166 6.41L17.9135 5L12.3509 10.59L6.78834 5L5.38525 6.41L10.9478 12L5.38525 17.59L6.78834 19L12.3509 13.41L17.9135 19L19.3166 17.59L13.754 12L19.3166 6.41Z" fill="white"/>
					</mask>
					<g mask="url(#maskClose)">
						<rect x="0.409668" width="23.8823" height="24" fill="#FFFFFF"/>
					</g>
				</svg>
			</div>
			<!-- Image info, comments and meta -->
			<div class="jp-carousel-info">
				<div class="jp-carousel-info-footer">
					<div class="jp-carousel-pagination-container">
						<div class="jp-swiper-pagination swiper-pagination"></div>
						<div class="jp-carousel-pagination"></div>
					</div>
					<div class="jp-carousel-photo-title-container">
						<h2 class="jp-carousel-photo-caption"></h2>
					</div>
					<div class="jp-carousel-photo-icons-container">
						<a href="#" class="jp-carousel-icon-btn jp-carousel-icon-info" aria-label="Sichtbarkeit von Fotometadaten ändern">
							<span class="jp-carousel-icon">
								<svg width="25" height="24" viewBox="0 0 25 24" fill="none" xmlns="http://www.w3.org/2000/svg">
									<mask id="maskInfo" mask-type="alpha" maskUnits="userSpaceOnUse" x="2" y="2" width="21" height="20">
										<path fill-rule="evenodd" clip-rule="evenodd" d="M12.7537 2C7.26076 2 2.80273 6.48 2.80273 12C2.80273 17.52 7.26076 22 12.7537 22C18.2466 22 22.7046 17.52 22.7046 12C22.7046 6.48 18.2466 2 12.7537 2ZM11.7586 7V9H13.7488V7H11.7586ZM11.7586 11V17H13.7488V11H11.7586ZM4.79292 12C4.79292 16.41 8.36531 20 12.7537 20C17.142 20 20.7144 16.41 20.7144 12C20.7144 7.59 17.142 4 12.7537 4C8.36531 4 4.79292 7.59 4.79292 12Z" fill="white"/>
									</mask>
									<g mask="url(#maskInfo)">
										<rect x="0.8125" width="23.8823" height="24" fill="#FFFFFF"/>
									</g>
								</svg>
							</span>
						</a>
												<a href="#" class="jp-carousel-icon-btn jp-carousel-icon-comments" aria-label="Sichtbarkeit von Fotokommentaren ändern">
							<span class="jp-carousel-icon">
								<svg width="25" height="24" viewBox="0 0 25 24" fill="none" xmlns="http://www.w3.org/2000/svg">
									<mask id="maskComments" mask-type="alpha" maskUnits="userSpaceOnUse" x="2" y="2" width="21" height="20">
										<path fill-rule="evenodd" clip-rule="evenodd" d="M4.3271 2H20.2486C21.3432 2 22.2388 2.9 22.2388 4V16C22.2388 17.1 21.3432 18 20.2486 18H6.31729L2.33691 22V4C2.33691 2.9 3.2325 2 4.3271 2ZM6.31729 16H20.2486V4H4.3271V18L6.31729 16Z" fill="white"/>
									</mask>
									<g mask="url(#maskComments)">
										<rect x="0.34668" width="23.8823" height="24" fill="#FFFFFF"/>
									</g>
								</svg>

								<span class="jp-carousel-has-comments-indicator" aria-label="Dieses Bild verfügt über Kommentare."></span>
							</span>
						</a>
											</div>
				</div>
				<div class="jp-carousel-info-extra">
					<div class="jp-carousel-info-content-wrapper">
						<div class="jp-carousel-photo-title-container">
							<h2 class="jp-carousel-photo-title"></h2>
						</div>
						<div class="jp-carousel-comments-wrapper">
															<div id="jp-carousel-comments-loading">
									<span>Kommentare werden geladen …</span>
								</div>
								<div class="jp-carousel-comments"></div>
								<div id="jp-carousel-comment-form-container">
									<span id="jp-carousel-comment-form-spinner"><svg class="jetpack-spinner" width="20" height="20" viewBox="0 0 100 100" xmlns="http://www.w3.org/2000/svg" aria-hidden="true" focusable="false"><circle cx="50" cy="50" r="46" fill="none" stroke="#ddd" stroke-width="8"/><path d="M 50 4 A 46 46 0 0 1 96 50" fill="none" stroke="currentColor" stroke-width="8" stroke-linecap="round"><animateTransform attributeName="transform" type="rotate" dur="1.4s" from="0 50 50" to="360 50 50" repeatCount="indefinite"/></path></svg></span>
									<div id="jp-carousel-comment-post-results"></div>
																														<form id="jp-carousel-comment-form">
												<label for="jp-carousel-comment-form-comment-field" class="screen-reader-text">Verfasse einen Kommentar&#160;&hellip;</label>
												<textarea
													name="comment"
													class="jp-carousel-comment-form-field jp-carousel-comment-form-textarea"
													id="jp-carousel-comment-form-comment-field"
													placeholder="Verfasse einen Kommentar&#160;&hellip;"
												></textarea>
												<div id="jp-carousel-comment-form-submit-and-info-wrapper">
													<div id="jp-carousel-comment-form-commenting-as">
																													<fieldset>
																<label for="jp-carousel-comment-form-email-field">E-Mail (Erforderlich)</label>
																<input type="text" name="email" class="jp-carousel-comment-form-field jp-carousel-comment-form-text-field" id="jp-carousel-comment-form-email-field" />
															</fieldset>
															<fieldset>
																<label for="jp-carousel-comment-form-author-field">Name (Erforderlich)</label>
																<input type="text" name="author" class="jp-carousel-comment-form-field jp-carousel-comment-form-text-field" id="jp-carousel-comment-form-author-field" />
															</fieldset>
															<fieldset>
																<label for="jp-carousel-comment-form-url-field">Website</label>
																<input type="text" name="url" class="jp-carousel-comment-form-field jp-carousel-comment-form-text-field" id="jp-carousel-comment-form-url-field" />
															</fieldset>
																											</div>
													<input
														type="submit"
														name="submit"
														class="jp-carousel-comment-form-button"
														id="jp-carousel-comment-form-button-submit"
														value="Kommentar absenden" />
												</div>
											</form>
																											</div>
													</div>
						<div class="jp-carousel-image-meta">
							<div class="jp-carousel-title-and-caption">
								<div class="jp-carousel-photo-info">
									<h3 class="jp-carousel-caption" itemprop="caption description"></h3>
								</div>

								<div class="jp-carousel-photo-description"></div>
							</div>
							<ul class="jp-carousel-image-exif" style="display: none;"></ul>
							<a class="jp-carousel-image-download" href="#" target="_blank" style="display: none;">
								<svg width="25" height="24" viewBox="0 0 25 24" fill="none" xmlns="http://www.w3.org/2000/svg">
									<mask id="mask0" mask-type="alpha" maskUnits="userSpaceOnUse" x="3" y="3" width="19" height="18">
										<path fill-rule="evenodd" clip-rule="evenodd" d="M5.84615 5V19H19.7775V12H21.7677V19C21.7677 20.1 20.8721 21 19.7775 21H5.84615C4.74159 21 3.85596 20.1 3.85596 19V5C3.85596 3.9 4.74159 3 5.84615 3H12.8118V5H5.84615ZM14.802 5V3H21.7677V10H19.7775V6.41L9.99569 16.24L8.59261 14.83L18.3744 5H14.802Z" fill="white"/>
									</mask>
									<g mask="url(#mask0)">
										<rect x="0.870605" width="23.8823" height="24" fill="#FFFFFF"/>
									</g>
								</svg>
								<span class="jp-carousel-download-text"></span>
							</a>
							<div class="jp-carousel-image-map" style="display: none;"></div>
						</div>
					</div>
				</div>
			</div>
		</div>

		</div>
		<link rel='stylesheet' id='jetpack-swiper-library-css' href='https://allround-blog.de/wp-content/plugins/jetpack/_inc/blocks/swiper.css?ver=15.8' type='text/css' media='all' />
<link rel='stylesheet' id='jetpack-carousel-css' href='https://allround-blog.de/wp-content/plugins/jetpack/modules/carousel/jetpack-carousel.css?ver=15.8' type='text/css' media='all' />
<script type="text/javascript" src="https://allround-blog.de/wp-content/themes/hemingway/assets/js/global.js?ver=2.3.2" id="hemingway_global-js"></script>
<script type="text/javascript" src="https://allround-blog.de/wp-includes/js/comment-reply.min.js?ver=6.8" id="comment-reply-js" async="async" data-wp-strategy="async"></script>
<script type="text/javascript" src="https://allround-blog.de/wp-content/plugins/enlighter/cache/enlighterjs.min.js?ver=fn+b0MXDe0j/NUW" id="enlighterjs-js"></script>
<script type="text/javascript" id="enlighterjs-js-after">
/* <![CDATA[ */
!function(e,n){if("undefined"!=typeof EnlighterJS){var o={"selectors":{"block":"pre.EnlighterJSRAW","inline":"code.EnlighterJSRAW"},"options":{"indent":2,"ampersandCleanup":true,"linehover":true,"rawcodeDbclick":false,"textOverflow":"scroll","linenumbers":false,"theme":"enlighter","language":"generic","retainCssClasses":false,"collapse":false,"toolbarOuter":"","toolbarTop":"{BTN_RAW}{BTN_COPY}{BTN_WINDOW}{BTN_WEBSITE}","toolbarBottom":""}};(e.EnlighterJSINIT=function(){EnlighterJS.init(o.selectors.block,o.selectors.inline,o.options)})()}else{(n&&(n.error||n.log)||function(){})("Error: EnlighterJS resources not loaded yet!")}}(window,console);
/* ]]> */
</script>
<script type="text/javascript" id="jetpack-stats-js-before">
/* <![CDATA[ */
_stq = window._stq || [];
_stq.push([ "view", {"v":"ext","blog":"244281421","post":"228","tz":"0","srv":"allround-blog.de","j":"1:15.8"} ]);
_stq.push([ "clickTrackerInit", "244281421", "228" ]);
/* ]]> */
</script>
<script type="text/javascript" src="https://stats.wp.com/e-202621.js" id="jetpack-stats-js" defer="defer" data-wp-strategy="defer"></script>
<script type="text/javascript" id="jetpack-carousel-js-extra">
/* <![CDATA[ */
var jetpackSwiperLibraryPath = {"url":"https:\/\/allround-blog.de\/wp-content\/plugins\/jetpack\/_inc\/blocks\/swiper.js"};
var jetpackCarouselStrings = {"widths":[370,700,1000,1200,1400,2000],"is_logged_in":"","lang":"de","ajaxurl":"https:\/\/allround-blog.de\/wp-admin\/admin-ajax.php","nonce":"c78b84864e","display_exif":"1","display_comments":"1","single_image_gallery":"1","single_image_gallery_media_file":"","background_color":"black","comment":"Kommentar","post_comment":"Kommentar absenden","write_comment":"Verfasse einen Kommentar\u00a0\u2026","loading_comments":"Kommentare werden geladen\u00a0\u2026","image_label":"Bild im Vollbildmodus \u00f6ffnen.","download_original":"Bild in Originalgr\u00f6\u00dfe anschauen <span class=\"photo-size\">{0}<span class=\"photo-size-times\">\u00d7<\/span>{1}<\/span>","no_comment_text":"Stelle bitte sicher, das du mit deinem Kommentar ein bisschen Text \u00fcbermittelst.","no_comment_email":"Bitte eine E-Mail-Adresse angeben, um zu kommentieren.","no_comment_author":"Bitte deinen Namen angeben, um zu kommentieren.","comment_post_error":"Dein Kommentar konnte leider nicht abgeschickt werden. Bitte versuche es sp\u00e4ter erneut.","comment_approved":"Dein Kommentar wurde freigegeben.","comment_unapproved":"Dein Kommentar wartet auf Freischaltung.","camera":"Kamera","aperture":"Blende","shutter_speed":"Verschlusszeit","focal_length":"Brennweite","copyright":"Copyright","comment_registration":"0","require_name_email":"1","login_url":"https:\/\/allround-blog.de\/wp-login.php?redirect_to=https%3A%2F%2Fallround-blog.de%2Fsoftware%2Fdeine-flutter-wetter-app-schritt-fuer-schritt-teil-3%2F","blog_id":"1","meta_data":["camera","aperture","shutter_speed","focal_length","copyright"]};
/* ]]> */
</script>
<script type="text/javascript" src="https://allround-blog.de/wp-content/plugins/jetpack/_inc/build/carousel/jetpack-carousel.min.js?ver=15.8" id="jetpack-carousel-js"></script>
<error>
    <code>internal_server_error</code>
    <title><![CDATA[WordPress &amp;rsaquo; Fehler]]></title>
    <message><![CDATA[&lt;p&gt;Es gab einen kritischen Fehler auf deiner Website.&lt;/p&gt;&lt;p&gt;&lt;a href=&quot;https://wordpress.org/documentation/article/faq-troubleshooting/&quot;&gt;Erfahre mehr über die Problembehandlung in WordPress.&lt;/a&gt;&lt;/p&gt;]]></message>
    <data>
        <status>500</status>
    </data>
</error>